All posts by Thomas Witherspoon

Field Radio Kit Gallery: KK7ISX’s Xiegu X6100 Field Kit

Many thanks to Todd (KK7ISX) who shares the following article about his portable field radio kit which will be featured on our Field Kit Gallery page. If you would like to share your field kit with the QRPer community, read this post.


KK7ISX’s Xiegu X6100 Field Kit

Hey Thomas, I love perusing the Field Radio Kit Gallery section of your website. It’s helped me dial in my SOTA kit while I’ve been injured this fall so I’d like to pay it forward.

Photos

This is my current set up for my Xiegu X6100:

Equipment list:

[Note: All Amazon and Radioddity links are affiliate links that support QRPer.com at no cost to you.]

André shares a CL program he created to send emails via ADIF files

Many thanks to André (VE2ZDX) who writes:

Hi Thomas,

I have written some pieces of software to automate the sending of emails to callsigns in adif files. I wrote them to help myself and they work very well. One of them I’m making publicly available since it’s very simple and, although it’s pure command line, I believe most hams would be able to use it.

In this video I explain it and teach how to customize it to your needs:

https://youtu.be/zV5nxNsP8MY?si=-a99LDDrXYeDCMLO

This software will send one email per callsign in the adif file you choose. It can be used for many things but it fits very well the use case where you record a POTA activation and want to send the link of the video to everyone in the log. It’s specially ideal for POTA because you can download the log per activation from the POTA website =]

The motivation to create this software comes from the fact that I don’t use paper QSL cards anymore, instead I record the QSO and use YouTube as video storage. And since I have it on YouTube already, why not share with the other ham? They love it!

Also, recordings (audio or video) of your radio activities becomes so as they age! See an example. This is the first time tried QRP on the ham bands:

https://youtu.be/50yzsZfas30?si=_jmr-D9l5TkGR1h5

Just from this recording I learned so many things, such as the speaker I had sucked! You can hear much more in the recording than what I could hear in that session heheh

If you want feel free to share this software with other operators, I’d be happy if it helped more people publish real ham radio content on YouTube, like yours.

73

Thank you so much for sharing this, André. I’m sure there are others who record their activations on video and will benefit from your command line tool! 

October Leaf Colors at Lake James: Pairing the Elecraft KX1 and Chelegance MC-750

This past fall was a busy season for me.

So busy, in fact, I completely overlooked an activation video I filmed two months ago (on Monday, October 23, 2023)!

That said, one of the things I love about making field reports and recording videos is re-living activations a second time. It’s fun to remember the site conditions, the weather, the radio/antenna choices, and all of the folks I might have logged.

I enjoyed stepping back in time a couple of months for this one!

Lake James State Park (K-2739)

That Monday was the first day I surfaced to fit in an activation after fighting a respiratory bug the previous week. I felt much better and tested negative for Covid, so I made my way to Hickory to help my parents with some tasks.

On the way that morning, I stopped by Lake James to play a little POTA with one of my favorite radios in the world: the Elecraft KX1.

On October 23–as I mention in the video–the QRP world had only just learned about the new Elecraft KH1 and I had yet to receive the almost-production unit I ordered as a field tester.

I knew that once I received the KH1, I’d be using it heavily for a few weeks, so I wanted to fit in a little KX1 time in advance!

POTA in Color!

The weather and fall colors at Lake James were absolutely stunning!

New KX1 Tufteln Cover!

Back when I filmed this video, it had only been one week since the W4 SOTA campout where my friend Joshua (N5FY) gave me a few prototype snap-on protective covers for my KX1s.

These covers are very clever because they protect all of the important front-panel components yet remain very low-profile so add little bulk to the radio.

Image: Tufteln.com

Joshua provides two new screws for the front panel (you simply replace out the stock KX1 screw); the cover magnetically snaps onto the higher-profile screws and seats itself securely.

Image: Tufteln.com

I demonstrate my cover in the activation video.

At the time, this was a product Joshua was considering adding to the Tufteln line-up–since then, he’s made it available to order–click here to check it out.

At present, Joshua offers the covers in two colors: black and light brown. Mine are the light brown color.

You’ll notice in the video that Joshua added my callsign to the covers he gave me. I don’t think the production covers are customized with your callsign because Joshua makes these in batches. You would need to check with him about customization–I assume there would be an extra charge and lead time for that because it would require modifying the file and printing a one-off cover.At any rate, I love the covers and have added them to all of my KX1s. Note that I used a Sharpie to write the name of each radio on the cover–this makes it very easy to tell the difference between my KX1 models (they’re named Ingrid, Greta, and Ruby)!

Gear:

Note: All Amazon, CW Morse, ABR, Chelegance, eBay, and Radioddity links are affiliate links that support QRPer.com at no cost to you.

On The Air

It was early enough in the morning that I decided to spend some time on the 40 meter band to work POTA “locals.” I deployed my Chelegance MC-750 with the 40 meter coil.

I tested the SWR and discovered it was high due to a loose connection on the end of the cable assembly–I fixed that and the SWR came down to 2.5:1. With the MC-750, I could have easily lengthened or shortened the whip to get a perfect match, but instead I took the lazy (& speedy) route and simply used the KX1 ATU to get a 1:1 match.

Even though I’d spent a long time talking about the KX1, KH1, the Tufteln cover, etc. in the  video, I actually didn’t have a lot of on-the-air time. (Typical me to talk away my activation time!).

I started calling CQ POTA and the contacts started rolling in.

Within ten minutes, I’d already worked ten contacts.

I worked a couple more, then called QRT. Looking at the time, I had to end this activation earlier than I’d hoped. I needed to hit the road again.

I packed up in short order, but still took a few moments to enjoy the beauty of that lovely autumn morning.

QSO Map

Here’s what this five watt activation looked like when plotted out on a QSO Map:

Activation Video

Here’s my real-time, real-life video of the entire activation.  As with all of my videos, I don’t edit out any parts of the on-air activation time. In addition, I have monetization turned off on YouTube, although that doesn’t stop them from inserting ads before and after my videos.

Note that Patreon supporters can watch and even download this video 100% ad-free through Vimeo on my Patreon page:

Click here to view on YouTube.

Thank you

Thank you for joining me on this activation!

I hope you enjoyed the field report and my activation video as much as I enjoyed creating them. I enjoyed reliving this Octeber activation.

Of course, I’d also like to send a special thanks to those of you who have been supporting the site and channel through Patreon and the Coffee Fund. While certainly not a requirement as my content will always be free, I really appreciate the support.

As I mentioned before, the Patreon platform connected to Vimeo make it possible for me to share videos that are not only 100% ad-free, but also downloadable for offline viewing. The Vimeo account also serves as a third backup for my video files.

Thanks for spending part of your day with me!

Here’s wishing all of the you best of the Holiday Season!

Cheers & 72,

Thomas (K4SWL)

K3ES Activates Waco Mammoth National Monument

Many thanks to Brian (K3ES) who shares the following guest post:


The National Park Service welcomes you to Waco Mammoth National Monument

Activating K-0975, Waco Mammoth National Monument

by Brian (K3ES)

At the end of November 2023, my wife and I loaded her minivan, and headed out into the first significant snowfall of the season.  I had already been out that morning in my 4WD truck to pull a friend’s car out of a ditch, so I was driving carefully.  Our drive took us from our home in northwest Pennsylvania to Baltimore, MD.  Happily, weather conditions improved as we went south and east.  We were meeting our son, daughter-in-law, and 2-1/2 year old grandson for a family trip to Waco, TX (we flew out of Baltimore-Washington International Airport early the next morning).  My wife and daughter-in-law are particular fans of Fixer-Upper and Chip and Joanna Gaines, all based in Waco.  Us men-folk were to be educated in the finer points of appreciating this pop-culture phenomenon.  Ultimately, we certainly did appreciate the finer points of dining in Waco.

One side-trip that amazed us all was a 10 minute drive up the road to Waco Mammoth National Monument.  This relatively new addition to the National Park system is also listed as Parks on the Air (POTA) entity K-0975.  Back in the days when the area occupied by the National Monument was private land, two exploring teenagers, who may not have had proper permission, found a bone, a big bone.  This bone was delivered to a local museum for identification, and ultimately determined to have been the femur of a female Columbian Mammoth.  Legalities being as they are, it took a while longer for the location of the discovery to be made public.  An interested and civic-minded land owner made the process less traumatic than might have been, particularly for the wandering teenagers.  He also started the process to preserve the site and its archaeological treasures for the public, ultimately leading to its designation as a National Monument.  Over subsequent years, archaeological excavation discovered a lot more bones – skeletons from an entire nursery herd of Columbian Mammoths, along with skeletons from other species that visited what was apparently a dangerous waterhole during the last ice age.

A view of the interior of the building constructed to protect the archaeological site.  Near the entry door is a full-sized artist’s rendition of a Columbian Mammoth.  Standing up to14 feet high at the shoulder, Columbian Mammoths were significantly larger than their better known Woolly Mammoth cousins.  This site is unique in that the bones of an entire nursery herd, including multiple females and their young, were found together here.
Some of the partially excavated mammoth skeletons contained in the enclosure building.
Also found in this excavation site was a Western Camel skeleton.  It is thought that the large number, numerous species, and wide range of ages of the skeletons discovered at this site resulted from entrapment in thick mud that formed the bottom of a persistent waterhole.

Since the discovery, many skeletons have been excavated and removed for study, but many more remain at the site awaiting future recovery.  A building has been constructed to cover the excavation and protect the remaining skeletons, and this building is the amazing focal point of the Waco Mammoth National Monument.  Ranger-led tours are available, and very much worthwhile.

Operating QRP CW on a beautiful afternoon at K-0975, Waco Mammoth National Monument.  My station is set up in a grassy field sometimes used for overflow parking.

Setting Up to Activate K-0975

After the tour and a look at the excavation site, I excused myself and set up to activate K-0975.  Before the trip, I had sent an email to Phil – WA5PQL, who is the most frequent activator at K-0975.  He was gracious and helpful in providing information about the park, the staff, and the locations most suitable for activating.  His assistance made a quick, low-stress activation a near certainty.  After checking in with the Park Rangers, I had directions and permissions, so all that remained a concern was HF propagation.

While the previous day had been overcast with drizzle, Friday, December 1, 2023, was sunny and warm.  It was perfect for walking around the site, and for an outdoor activation.  Unfortunately, the same sun that gave us the bright, warm day, had been active producing solar flares that could interfere with radio communications.  The only way to know for sure that I could make contacts was to set up my station and call CQ, so that is the path I chose.

Field kit contained in a re-purposed Peltor 4” x 6” x 9” padded headset pouch.  This compact kit was easily packed in a carry-on backpack for airline travel.  The pouch’s integral handle also made for easy transport to the activation site.

Field kit contents from the upper-left (click image above to enlarge):

  1. 33 gal trash bag for dry seating,
  2. 15 ft RG316 feedline with BNC male connectors,
  3. Two pieces of nylon cord,
  4. Medium-sized pill bottle to be filled with dirt or stones and used as a throw weight,
  5. 80 ft of Marlow Excel 2mm arborist’s throw line,
  6. BaMaTech TP-III paddles with connecting cable carried in an Altoids tin,
  7. Nail clippers as a TSA-approved tool,
  8. Elecraft KX2 transceiver with SideKX end-panels and polycarbonate cover,
  9. Tufteln 9:1 end-fed random wire antenna with 35 ft radiator and 17 ft counterpoise,
  10. Generic ear-bud headphones,
  11. Homebrew VK3IL-designed pressure paddles with adjacent protective sleeve sitting atop a plastic ziploc bag,
  12. Rite in the Rain notepad for logging,
  13. Pentel Twist-Erase 0.9mm mechanical pencil,
  14. Miscellaneous cable ties.

Not pictured is a Packtenna 10m collapsable fiberglass mast that was available, but not used for this activation.

I brought a very small, but capable, field kit based on my Elecraft KX2 and a Tufteln End-fed Random Wire antenna.  A couple of CW keys, a short feedline, and generic earbuds completed the station.  I also brought a notepad and a pencil for logging, a plastic garbage bag for seating, and some cordage.  The most peculiar part of my kit was a small pill bottle with a hole in its lid.  I filled the pill bottle with dirt, passed the end of a 2mm line through the lid and secured it with a knot.  I was able to use the dirt-filled bottle as a throw weight to get the line over a tree branch for raising the antenna, then I detached the bottle and returned the dirt.  All elements of the kit worked as intended, and TSA asked no questions during my trips through airport security. Continue reading K3ES Activates Waco Mammoth National Monument

Field Radio Kit Gallery: KV4AN’s Icom IC-705 Field Kit

Many thanks to Steve (KV4AN) who shares the following article about his portable field radio kit which will be featured on our Field Kit Gallery page. If you would like to share your field kit with the QRPer community, read this post


KV4AN’s Icom IC-705 Field Kit

by Steve (KV4AN)

A requirements-driven portable communication capability, using a modular implementation concept, was the basis for my IC-705 Field Kit.  I’ve loved portable radio operating since shortly after getting my license back in 1975.  My first portable radio was the over-the-shoulder Kenwood TR-2200A 2m FM transceiver.  There is now a happy confluence of advanced electronics technology, customer-focused radio manufacturers, radio sport groups like POTA and SOTA, and hams who want to combine outdoor adventures with their ham radio hobby.   The result is the ability to create and operate highly capable portable ham radio field kits, such as the IC-705 Field Kit that I’m going to describe in this article.

The kit consists of up to three man-packable bags: a Radio Bag, an Antenna Bag, and a Computer Bag, as shown in figure (1).  The Radio and Antenna bags must be brought to every activation, but the computer bag can be left at home if I don’t plan to use digital modes.  I can also swap out Antenna Bags, depending on what kind of antenna you need for the specific activation location and park rules, like: ability to use a ground spike, size of activation area, presence of suitable trees, primary operating bands and expected propagation conditions, and so forth.

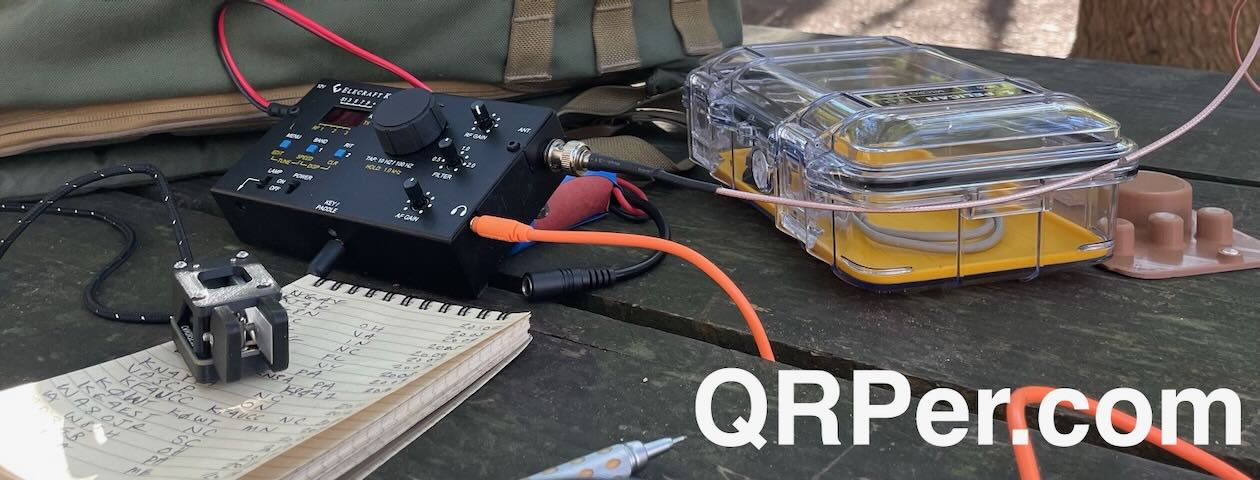
Figure 1.  IC-705 Field Kit loaded up and ready for a park activation (click image to enlarge).

Radio Bag

The Radio Bag contains everything necessary to operate the IC-705 in the field.  It can be carried in one hand, worn over-the-should, or worn as a fanny pack.  With the load-out listed below and shown in figure (2), it weighs around 15 lbs.

[Gear links list at end of article.]

A. Icom IC-705 Transceiver.  Chosen for its “all-band”, “all-mode” capability with base station features and performance.  It’s a superb, state-of-the art radio, and a joy to operate – but, it “feels” a little delicate with the large unprotected touch screen and protruding light plastic knobs.

B. IC-705 Front Panel Cover. This was chosen to protect the delicate front panel of the IC-705.  I didn’t want one of the cages, because they add bulk and weight to a reasonably small and light weight radio.  This cover fits perfectly, doesn’t mar the radio body, and provides great impact protection when the radio is not in use.

C. Icom AH-705 Antenna Tuner. This is a good antenna tuner and matches the IC-705 (in appearance and electronic functionality) very well.  It is large compared to the Elecraft T1, but it runs off two “AA” batteries, which I really like.  The tuner uses a BNC coaxial patch cable and a 1/8” stereo patch cable for connection to the IC-705.   I don’t need to use this tuner very often as my antenna typically has a low SWR on 40 – 10 meters.

D. Icom HM-243 Speaker-Microphone. The HM-243 comes with the IC-705.  I’ve never used the speaker part of it, but the microphone has good voice reproduction.  If needed, I planned to use the speaker in place of headphones.

E. N3ZN ZN-QRP Special Iambic Keyer Paddle.  I got this marvelous quality and wonderful feeling paddle in beautiful Blaze Orange – so I feel like I’m the radio operator from a downed aircraft trying to get rescued.  The paddle is a little heavy for portable use, but at least it doesn’t move around while sending.  It uses a 1/8” stereo plug patch cable for connection to the IC-705.

F. Tactical Range Bag. This bag was chosen because the IC-705 fit perfectly in the main compartment and there were additional compartments for all the small accessories.  It also came in Army Green color.

G. Icom MBF-705 Desk Stand. Stabilizes the radio when it is on a table or in the Radio Bag and positions it for easy viewing and operating.

Figure 2. Radio Bag and Contents (click image to enlarge).

H. Icom BP-272 Standard Battery Pack. 7.4v, 1880 mAh pack that came with the radio and attaches to the back of it.  I use this as the spare battery pack.

I. Icom BP-307 High-Capacity Battery Pack. 7.2V, 3150 mAh pack that attaches to the back of the IC-705.  So far, this battery pack has been sufficient for my POTA activations.

J. Tactical Drop Pouch.  This pouch fits in the bottom of the main compartment of the Radio Bag and can hold either a Bioenno 12V, 12Ah, LiFePO4 battery or the front panel cover (used as a spacer).  The IC-705 sits on top of the Tactical Drop Pouch when in the Radio Bag, which elevates it enough that the IC-705 can be easily operated.

K. Smiley Antenna Company TRI-Band.  This is a telescoping 1/4 wave 2m and 5/8 wave 440 antenna that attaches directly to the IC-705.  It performs well with the IC-705 and fits inside the tactical bag when collapsed.  Another advantage of the telescoping whip is it can be adjusted for best SWR.

L. USB Cable.  The USB C to Micro USB cable is used to connect the IC-705 to the portable station computer to control the radio and pass audio and data.  This cable is needed, even if you connect using WiFi for rig control and audio, to send GPS NMEA format position and time data from the IC-705 to the computer.  I was told by Icom Technical Support that the cable should not be longer than 3 feet and should have an RFI Choke at each end.  The combination of the short cable, USB C connector instead of USB A, and the RFI chokes seems to help the noise problem that that the IC-705 has when a USB cable is plugged into it.  The other solution is using the RS-BA1 software.

M. Emergency HF Antenna. This is a home-brew antenna with a 24 1/2 foot radiator and 12 1/2 foot counterpoise that attaches to the AH-705 Antenna Tuner with a BNC to binding post adapter.  It is rolled up on a line winder and there is some paracord to hold up the end of the radiator.  This is a back up antenna in case something happens to the regular antenna.

N. Assorted Coaxial Adapters: BNC to SO-239, SO-239 Barrel, BNC Elbow, and BNC to binding post.

O. Tactical Pen.  A nice heavy pen for outdoors use.   Used for logging.

P. All-Weather Notebook. Weather-proof notepad for outdoor use.  Used for logging.

Q. Leatherman squirt E4: A Swiss Army-like miniature tool set with a wire stripper and screw drivers.  It is used to perform minor repairs in the field.  This tool has been discontinued by the manufacturer.

R. Gerber Recon Task Flashlight.   A rugged miniature flashlight that runs on 1 “AA battery and has different color lens.

Antenna Bag

An Antenna Bag goes on every activation.  The primary bag contains the components of the Chameleon Antenna Tactical Delta Loop (TDL) antenna.  The TDL is a versatile antenna that can be configured as a small Inverted Delta Loop or a 17 foot ground mounted vertical.  I usually use the 17 foot ground mounted vertical configuration because it takes less than five minutes to deploy, performs well, doesn’t attract much attention, and does not require a tuner for 40 through 10 meters.

The Antenna Bag itself is the Sunrise Tactical Gear, Tactical Tripod Bag Gen 2 (32 inch length).  It is exceptionally durable and holds all the components of the TDL antenna.  It can be worn across the back for easy carrying.  The Antenna Bag and all components weigh around 11 lbs. Continue reading Field Radio Kit Gallery: KV4AN’s Icom IC-705 Field Kit

The Lifeline of CW and POTA

Many thanks to Teri (KO4WFP) who shares the following guest post:


The Lifeline of CW and POTA

by Teri (KO4WFP)

The past five months have been tumultuous. I am now divorced and my son and I are making a new life for ourselves with my family. Those of you who’ve been through a divorce know how stressful and difficult a process it is, especially when navigating it for the first time. You are undoing relationships and patterns of behavior and figuring out how to move forward and what that looks like.

Why do I tell you this? Partially because I want those of you who’ve said “where the heck have you been?” to know why I’ve been absent from QRPer. However, I also want to thank all of you in the ham community because it is this community that saw me through my difficulties. Hams are some of the kindest and most wonderful people, especially CW and POTA hams. This community has rallied to my side and given me a reason to keep moving forward.

As Thomas noted in his September 17 post of this year, CW is indeed “radio therapy.” After I relocated, it was six weeks before I had a home station again. Six LONG weeks without seeing my code buddies – Caryn KD2GUT, Glenn W4YES, and Charles W4CLW – on the air. I felt cut off not having those QSOs, not being able to get on the air when I desired, like someone had removed my legs! The absence reinforced how much CW and POTA mean to me.

While working to get a home station again, I latched onto POTA. I vividly recall driving home from my first POTA activation after leaving my ex-husband and, for the first time in several weeks, the stress temporarily melted away. Life, for a few hours, felt normal. I felt like my old self.

CW and POTA were indeed therapy as I put my life back together. Getting out and activating was good for my mind and body. Ham radio for me is about relationships and seeing ops who hunt me regularly was like reconnecting with friends saying “hi”.

POTA became an integral part of my healing process and I pursued activations at George L. Smith State Park and, my old stomping ground, Butter Bean Beach, part of Wormsloe State Historic Site.

George L. Smith State Park is a pretty site for POTA. The park’s focal point is Mill Pond Lake which was created by the damming of 15-Mile Creek in 1880. Visitors can rent kayaks or canoes to explore three paddling trails in the 412-acre lake and its wetlands but are warned against swimming due to the presence of alligators. The land adjacent to the lake has seven miles of nature trails through sand-bottomed forest with hardwoods and longleaf pine.

The old mill at the site still exists. The original floodgates are used to control the water level in the lake with the addition of an electric hoist to open and close the gates. The mill, known as Watson Mill, is housed in a bridge which was open to motor traffic until 1984 and is one of only two mills operated by the State of Georgia. Watson Mill housed a sawmill for lumber as well as a gristmill, the latter which remains operational for demonstration purposes.

After a quick drive through the park, I chose to set up on the hill next to the park office which offered an open area without adjacent power lines. It wasn’t long before my EFRW was installed in a tree and I was on the air. Continue reading The Lifeline of CW and POTA

30 Meters with a 4 Foot Whip–? Impromptu POTA Hunting with the Elecraft KH1!

My Elecraft KH1 packed in a Pelican Micro M40 case. This protects my KH1 while traveling around in my EDC backpack.

On Friday, December 8, 2023, playing POTA was not in the plan.

I needed to finish a field report, publish it, then attempt to make a dent in my email and comments backlog. Lately–as you might have noticed–it’s been difficult to keep up with everything.

That morning, I dropped off my daughter at her robotics class, then made my way to the Mills River Library and municipal park.

I arrived at the park around 9:20 AM, parked my car at one of the free EV charging spots, then walked to the library front door only to discover a sign that said they’d be opening an hour late (10:00).

All of the sudden, I had 40 minutes to kill.

Since my Elecraft KH1 now lives in my EDC backpack full-time, I thought, “Why not hunt a little POTA?

I started walking to the baseball field to set up then turned around, went back to the car, and grabbed my action camera. I mean…why not film this session since the camera was in the car trunk/boot? Right–? Right!

Gear:

Note: All Amazon, CW Morse, ABR, Chelegance, eBay, and Radioddity links are affiliate links that support QRPer.com at no cost to you.

POTA Hunting!

Keep in mind that the Elecraft KH1 is designed to operate on 20, 17, and 15 meters using the 4 foot whip antenna (assuming you have the internal ATU option).

This was awfully early in the morning for any of those bands–I knew 20 meters would be my best bet of the three.

I tuned around, but I couldn’t hear or work any of the handful of activators on 20 meters. They were all outside my 20M propagation footprint–most were simply too close for 20M.

Then I noticed my buddy, John (AE5X) spotted on the 30 meter band.

For kicks, I tuned down to the 30 meter band, found a clear spot, then hit the ATU button. I was surprised to achieve a 2:1 match!

What?

Of course, a decent impedance match doesn’t equate to efficiency. Then again, what did I have to lose? Nothing…that’s what!

I called John once, but another strong station caught his attention. Once he finished that exchange, I called him again and he replied! Woo hoo!

I suspect my effective power output was around 1-2 watts, but it was enough to make an exchange with John, so I was a very happy camper.

I also tried to work KD8IE on 30 meters, but could not punch through the strong signals from other POTA hunters.

By chance, though, I heard my buddy Eric (WD8RIF) calling CQ POTA just below KD8IE.  I could hear Eric because I had my filter wide open–as in SSB wide.

I tuned  down, called him and he came back with my call and a question mark after two tries.

We exchanged details, sent 72, and logged each other. What fun!

I found out later that my signal level was actually fine on Eric’s end, but I was *almost* outside of his CW filter edges. He struggled hearing me because I was too far from his centered frequency. I didn’t notice this on my end, of course, because I had my filter so wide open.

I’ve learned from this: next time I’ll narrow my filter before hunting stations. The majority of activators do not run with their filters wide open like I do.

By the way, if you’d like to read Eric’s field report from that same time frame, click here.

Video

Here’s the real-time, real-life “Slow TV” video of this hunting session with the KH1:

Click here to view on YouTube.

30M on the KH1 whip!

I’m pretty sure Elecraft wouldn’t recommend using your KH1 on 30 meters with the whip only because of its low efficiency, but I also know the KH1 will have no problem dealing with the 2:1 match. I bet you’d get an even better match if you lengthen the counterpoise–I simply used the supplied 13′ wire.

Of course–and again–30M on a 4′ whip is not an efficient antenna system, but it’s efficient enough to make some contacts! As my buddy Kurt (NT0Z) says, “RF gotta’ go somewhere.

I will check in with N6KR and see what he says about this setup.

Library time

Post activation, I found a comfy spot to work in the library and published a new field report.

It struck me that no one passing by would have ever guessed that I had a full HF station in my backpack! For just a moment, it made me feel like an unassuming Cold War spy!

Oh yeah, the backpack: I took advantage of a Black Friday sale at Trakke and purchased the Bannoch Backpack I’d been eyeing for weeks–the discount was deep!

I justified this purchase knowing that I was doing my bit to support the economy of Scotland! Ha ha! Seriously, though, I do love this backpack.

Thank you!

Thank you for joining me for this mini POTA hunting session!

As I mentioned before, the Patreon platform connected to Vimeo make it possible for me to share videos that are not only 100% ad-free, but also downloadable for offline viewing. The Vimeo account also serves as a third backup for my video files. Click here if you’d like to support me on Patreon. No pressure.

Thanks for spending part of your day with me!

Cheers & 72,

Thomas (K4SWL)

Field Radio Kit Gallery: KD0FNR’s Rockmite 20 and Tuna Topper

Many thanks to Hamilton (KD0FNR) who shares the following article about his portable field radio kit which will be featured on our Field Kit Gallery page. If you would like to share your field kit with the QRPer community, read this post.


Rockmite 20 and Tuna Topper Pack QRP Punch

by Hamilton (KD0FNR)

Our ham radio field kit—in my mind—revolves around simplicity. I’ll walk you through a lot of details, because we have a blast with the field kit and I love talking about it. At the end of the day, it’s a kit radio and amplifier housed in a couple of cans with lengths of wire we bought at a hardware store for an antenna, a cell phone power brick, and a keyer glued together out of video game switches and an old battery case. We’ve thrown the kit into cloth shopping bags and backpacks with equal measures of success. We once patched an antenna connection using washi tape.

OK, I said ‘our’ and ‘we’, but who are we? I’m the dad of three kids—one of whom recently passed her Technician radio exam, KO6BTY—who are 12, 11, and 8 years old. Right now, they’re rarely on the radio—of course, that’s about to change—they help with most aspects of our radio outings.

Which brings up the question, what do our radio outings look like? Our outings are pretty equally divided between, camping and day trips. Our entire family has enjoyed camping—and done a lot of it—since long before I got back into ham radio. Each of the kids went on their first camping trip when they were a few weeks old.  Our camping trips range from local, public transit enabled outings—we take the bus to Pantol Campground, across the Golden Gate Bridge from San Francisco where there are two POTAs readily available: Mt. Tamalpais State Park and  Muir Woods. We also take multi-day/week trips: I grew up in New Mexico, so the kids and I frequently find ourselves back there activating or attempting to activate sites like Villa Nueva State Park, Organ Mountains National Monument, and Cibola National Forest, among others. These are the outings that have led to large-ish battery selections you’ll see below.

Our day trips are quick runs along various local bus, train, and ferry lines with a hike tacked on the end. Within the peninsula that encloses San Francisco, we have several POTA locations and two easily reachable SOTA locations. We pretty frequently bus to a spot, and then spend a few hours hanging out in a nice park getting some radio time.

Having said all of that, you might have guessed that our kit would be optimized for easy travel. You’d be right. Now, finally, let’s talk about the kit!

Radio Details:

All of our equipment is home-built. It’s evolved over the last year-and-a-half into he tidy kit you see above. Finally having a ‘typical’ kit picture is actually what inspired this article.

Equipment List:

[Please note: All Amazon links are affiliate and support QRPer.com.]

  • Rockmite 20
  • Tuna Topper
  • One 20 ounce can Dole Pineapple Slices (emptied—see support crew; and cleaned)
  • Two RJ-45 breakout boards
  • One spool butcher’s twine (two if you’re feeling bougie)
  • One Imuto power brick that supplies 15 V when funneled through:
  • One Adafruit USB Type C Power Delivery Dummy Breakout – I2C or Fixed – HUSB238
  • Two banana jack sockets (plus a few more for spares)
  • Forty feet 12 gauge insulated/stranded wire
  • Twenty-five feet (or so) RJ-45 Ethernet cable (scavenged from the parts bin at our local maker space)
  • One antenna launcher (scavenged from available fallen tree limbs onsite)
  • One donut Bag from your favorite donut store
  • One roll of washi tape

The Rockmite is a rock-locked radio with two available frequencies that are 500 Hz apart from each other. That makes our antenna design really simple; we’ve got a dipole that’s trimmed to be resonant at 14057.5 kHz. Project TouCans puts out a QRP maximum 5 Watts. Our field kit has evolved to that 5 Watts though. We started out with the Flying Rockmite at 250 mW, then we made a power bump to 750 mW, and then with the addition of a Tuna Topper amplifier and a lot of experimenting we finally achieved a QRP maximum 5 Watts output power.

The QRPp Rockmites–having so little power combined with lots of somewhat confusing reading about antenna matchers and coaxial cable and baluns–led to the original Flying Rockmite. “Do you know what makes you not have to discuss feed lines?” I reasoned, “Not having a feedline.” And so, the RockMite was inserted into the dipole. I brought the keyer controls down to me and sent the power up along an Ethernet cable. Continue reading Field Radio Kit Gallery: KD0FNR’s Rockmite 20 and Tuna Topper

Ham Radio Workbenches On The Air (& POTA): A short field report and a very long activation video!

Many of you know I’m on the crew of the Ham Radio Workbench podcast. In fact, as of this month, I’ve been there a year now (my how time flies).  Although it shows a certain lack of judgement on their part, I’m glad they invited me on board!

On October 9, fellow HRWB crew member, Mark (N6MTS), pitched an idea to us via email:

“What do y’all think about doing an HRWB On The Air event?”

We all agreed it sounded like a great idea. Things like this normally take a year’s worth of planning, promoting, and organizing. Not when Mark’s in charge, though.

Next thing we know, Mark had us sorting out the best date/time (December 3, 2023/1800-22:00UTC) for HRWBOTA and even reached out to some amazing volunteers who helped put together a website and spotting page.

Holy cow!

December 3, 2023

I planned to operate the entire four hour event period from Lake James State Park (K-2730) since it would be an easy detour en route to Hickory, NC (where I was staying that night). Of course, each contact would could for both HRWBOTA and POTA.

The previous day, however, I learned that one of my daughters had a meeting in downtown Asheville from 18:00-19:00 UTC. She doesn’t have a driver’s license yet, so I had to take her. Had it not been an important meeting in advance of her finals, she would have skipped.

This really threw a wrench in the works. I knew that by the time her meeting ended and I dropped her off at the QTH, the earliest I could be at Lake James was 20:15-20:30 or so.

How could I increase my on-the-air HRWBOTA time?

KH1 to the rescue!

Since the Elecraft KH1 was packed in my EDC bag, I decided to play a little HRWBOTA in the parking lot behind the meeting building.

I wasn’t sure what to expect to be honest. I wasn’t spotting myself anywhere but the HRWBOTA spotting page, and I was limited to the 15, 17, and 20M bands with the KH1’s 4′ whip antenna.

I spotted myself, hit the air and started calling CQ HRWBOTA!

In the span of about 45 minutes, I managed to log a total of 15 stations! Not bad considering I was standing in an urban parking lot, swimming in QRM, and going QRP!

I didn’t make a video of this part of the HRWBOTA activation–sorry about that if you worked me then. I needed every moment of on-the-air time I could grab. Here’s my log sheet:

Lake James State Park (K-2739)

I legged it to Lake James after my daughter’s meeting–in fact, to save time, I started my activation video while I was still in my car driving on I-40.

I arrived at Lake James, parked, plugged in the car, grabbed my gear and made my way to the picnic area next to the lakeshore. It wasn’t hard to find a site with a tree that might support my KM4CFT 30/40M linked EFHW antenna.

I include the full antenna deployment and station set-up in my (rather long) activation video below. Continue reading Ham Radio Workbenches On The Air (& POTA): A short field report and a very long activation video!

A mystery gift! Thank you!

Someone obviously knows me very well.

I’d like to send my gratitude to the kind person who sent me this AeroPress via Amazon! No doubt, you’ll be seeing this in some of my POTA and Coffee field reports!

There was no mention of a sender–and perhaps they wanted to be a secret Santa–but I had to thank them.

What a brilliant early Christmas gift!