Category Archives: Articles

Part 2: N2YCH and K1PCN’s Dayton Hamvention Trip QRP POTA Rove

Many thanks to Conrad (N2YCH) who shares the first of a three-part field report series outlining his 2023 Hamvention rove with Peter (K1PCN). Click here for Part 1, and look for Part 3 next week!


Part 2: Dayton Hamvention Trip QRP POTA Rove

By Conrad Trautmann, N2YCH

Pennsylvania

Welcome to part two of three of the Hamvention QRP POTA Rove. If you missed part one, you can find that installment here.

Early on Thursday morning, May 18, 2023, Peter, K1PCN and I headed from Morgantown, West Virginia north to Pennsylvania to activate K-8920, the PA 223, Pennsylvania State Game Lands. While the park covered a large geographical area, we were able to find a parking lot not far off the highway that made it easy for us to get to and activate.

Peter spotted a nearby gazebo which was also a viewing area and hiked over to it to activate. If you look closely in the photo below, you can see it in the distance behind the sign and my antenna.  I stayed with the Jeep and set up on the tailgate using the Buddipole vertical.

Since it was early in the day, we used our frequency strategy of Peter on 40 meters and me on 20 meters. My QSO map here shows some decent DX for QRP on 20 meters at 8am ET.

Ohio

We traveled North towards Pittsburgh on Interstate 79 and then West on Interstate 70, passing through West Virginia again and then stopped at K-1934, Barkcamp State Park in Ohio.

I tuned my antenna for 17 meters and Peter activated on 20 meters.

I managed to activate the park, but it was slow going for me on 17, so when Peter finished up on 20, I changed to 20 meters and got a few more on that band just for good measure. Thinking that the slow QSO’s could have been the radio, I did switch to the IC-705 here, but that did not make any difference. It could have been conditions or our location. I did have better luck on 20 meters than 17. And I don’t know about you, but I can never go for just ten QSO’s. I feel like I need a few extra ones just in case. Here is a photo of me set up at a picnic table next to my antenna. Continue reading Part 2: N2YCH and K1PCN’s Dayton Hamvention Trip QRP POTA Rove

An in-depth review of the Xiegu G106 QRP HF transceiver

Note that the following review first appeared in the May 2023 issue of TheSpectrum Monitor magazine.

Update: Also, please note that the G106 is on sale at Radioddity at time of posting. With our affiliate link pricing is only $264 US (see note at end of review). Please read this review prior to making a purchase decision!


An in-depth review of the Xiegu G106 QRP HF transceiver

by Thomas (K4SWL)

Last year––in May of 2022, that is––Xiegu announced a new compact field radio that would be added to their line of transceivers: the Xiegu G106.

Xiegu has really made a name for themselves over the past few years with several transceiver offerings, many of which have become very popular. Among these:

  • The Xiegu G90 is a 20-watt transceiver with an excellent built-in ATU. The G90 has become a very popular field radio over the past few years.
  • The Xiegu X5101 is a five-watt shack-in-a-box HF transceiver covering 160-6 meters. The X5105 has become a go-to QRP portable due to its fine built-in ATU and built-in rechargeable battery pack.
  • The Xiegu X6100 is much like the X5105, in that it’s also a shack-in-a-box QRP transceiver, but it leverages SDR technology to provide a beautiful color spectrum display and a host of features not found on its predecessors. Many have adopted the X6100 because its operating system is Linux-based and many enthusiasts have created their own X6100 interface that promised direct digital mode operation.

Because we’re seeing more products like these from Xiegu, the up-and-coming Xiegu G106 stirred interest.

Moreover, Xiegu has become a low-cost leader among HF transceiver manufacturers. In each of the reviews I’ve published about Xiegu radios, my summary statement is that each unit offers a lot of performance for the price. Xiegu transceivers don’t have the most robust receiver front-ends, and the audio is unrefined, but their rigs get the job done and have some serious “fun factor.”

So when I first learned about the new Xiegu G106, I was curious where it would fit into their product line.

Introducing the Xiegu G106

As I was capping off my summer in Canada back in August of 2022, Xiegu retailer Radioddity started shipping the G106. Radioddity had me on the list to send a loaner G106 for review, but  upon my return I found myself so busy that I didn’t immediately request it.

I did watch, however, K8MRD’s initial and updated review of the G106 on YouTube. While it was less than stellar––understatement alert––more relevant to me was that Mike shipped his second evaluation unit to me on behalf of Radioddity.

I connected that G106 to a dummy load, checked the transmitted signal on my SDRplay RSPdx spectrum display, and it simply didn’t look very clean. In fact, it looked worse than it did when Mike checked it only a couple of weeks prior.

I shared my results with Radioddity and told them I didn’t feel comfortable putting the G106 on the air; they asked that the unit be returned and checked out.

Fast-forward to January 2023, when I was once again contacted by Radioddity to see if I would like to field test an updated G106? I answered that I was happy to do so, because I was curious whether the G106 experience had improved.

In the spirit of full disclosure, keep in mind that Radioddity is a Xiegu retailer/distributor––the company is not the manufacturer, nor is it owned by Xiegu. They sent this G106 to me on an extended loan for an honest evaluation.

So where does the G106 fit into the Xiegu product line?  It’s being marketed as a low-cost, entry level, multi-mode QRP HF transceiver that leverages 16-bit CODEC sampling to provide the user with a lot of radio for the price. It’s basic, and meant to be so, in that  it’s only a transceiver; there is no built-in ATU or battery. The G106 is marketed as a bare-bones portable HF transceiver.

I feel like it hits this mark.

The G106 doesn’t have a lot of features or controls one might expect in other Xiegu radios, but it has more features than any other modern HF radio I know of in its price class (see features list below). Indeed, I can’t think of any other 80-10 meter general coverage QRP transceiver that retails for $320 or less. The G106 has this market niche to itself for the moment.

Overview

When I first received the G106, I was a little surprised:  it was even more compact than I had imagined.

The sides of the G106 are rounded and the chassis extends beyond the encoder and front controls of the radio, thus the interior is quite well protected in the event the radio is dropped. This is one of the few QRP field radios on the market that doesn’t need an aftermarket cage. I’ve been transporting the G106 in an old hard shell headphone case a friend gave me. The case isn’t large, but it easily holds the G106 and a power cord with a bit of room to spare.


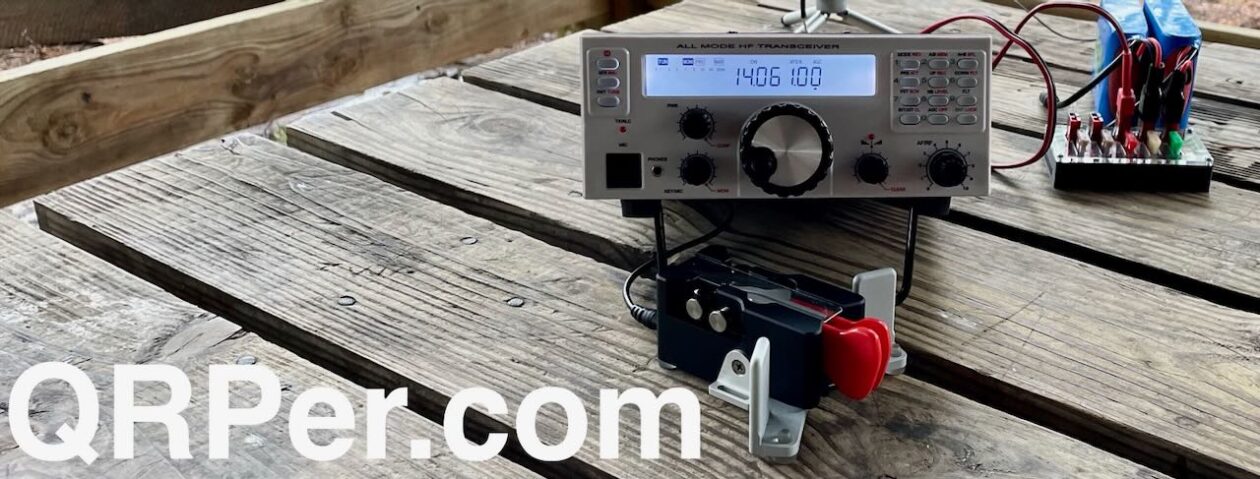
The G106 sports a small monochrome backlit display that’s very easy to read in the shack or in the field with full sunlight.

Besides the weighted encoder (which has soft detents), the volume control, and microphone port, there are also four multi-function buttons located under the small display on the front panel. On top of the radio, there is a power/backlight button, mode/pre-amp button, and two band buttons that also can be pressed and held to change the frequency cursor position. The internal speaker is also mounted on the bottom of the top cover, just behind the top panel buttons.

On the back of the G106, you’ll find a BNC antenna port, ground/earth lug, key port, COM port, 8 pin ACC port, and a DC input port.

The most conspicuous omission is a headphone or external speaker port. I would have expected this in a QRP field radio because operators often prefer using headphones in the field rather than a speaker. I know that some G106 owners have built their own RJ9 audio plug to port out the audio to headphones. There is a headphone port on the supplied speaker mic, but CW-only operators might prefer a more direct way to connect earphones in order to keep the bulk of their field kit to a minimum.

What is surprising is that the G106 has a very basic spectrum display that is actually quite useful!

Ergonomics

The ergonomics of the G106 are overall pretty good…but a bit quirky. To be honest, giving the user access to numerous functions and features on a radio this small is always going to affect ergonomics; there’s only so much control-surface real estate. Continue reading An in-depth review of the Xiegu G106 QRP HF transceiver

Guest Post: Lake Thunderbird (K-2792) with a homebrew transmitter!

Activating (sort of) Lake Thunderbird (K-2792) with a homebrew transmitter

Sam Duwe WN5C

When I dove into radio a couple years ago a few sub-hobbies caught my attention: QRP, portable ops, CW, and homebrew. Of course, these all fit nicely together, but in my mind there was a huge leap between soldering an unun and a building a radio. But why not try? What’s the worst that could happen by melting solder and then sitting at a picnic table? This is how I built a simple transmitter and kind of activated a park.

The Michigan Mighty Mite

Nearly everyone has heard about the Michigan Mighty Mite (MMM), a QRPp transmitter popularized by the Solder Smoke blog. There are countless YouTube videos and posts across the internet. It’s very simple: a single transistor, a variable cap, a coil, a crystal and some resistors and a cap. Supposedly one can get up to half a watt of output (I couldn’t). But with a small purchase from Mouser one can oscillate. That seemed pretty cool.

I hadn’t touched an iron until I started playing radio. But I’ve been drawn to homebrew projects. I built a regenerative receiver last year which was very rewarding. I’ve also put together kits (a QCX mini and a TR-35). But my dream has always been to construct a transmitter/receiver combo, or a transceiver. I thought a good place to start was the MMM.

I built the transmitter based on the common schematic for the 40-meter band. The MMM is crystal controlled but I opted to solder in a socket and buy a handful of crystals, so I have the luxury of operating on 7056, 7040, and 7030 kHz. I made a few other improvements, too. The first was to build a low pass filter to attenuate harmonics. Second, although I haven’t finished it yet, the switch on the right will be to choose between multiple crystals. And third, I added a BNC jack to connect a receiver, with a transmit switch. When not in use the transmitter will dump into a dummy load. This receiver switching idea was lifted from the design of the MMM that QRP Guys produces.

When I tested the transmitter at home the best I could get with my charged Bioenno 3 Ah battery was about 300 mW output. The filter is reducing things somewhat, but maybe I need to look into a different transistor or rewind the coil. But I was able to get a 339 signal report from Illinois (no sked) in the midst of distance lightning crashes, so I had a little confidence going forwards. School is out for me this summer, so I decided to head to the park. Continue reading Guest Post: Lake Thunderbird (K-2792) with a homebrew transmitter!

Guest Post: EmComm and FunComm!

Many thanks to Scott (KK4Z) who shares the following post from his blog KK4Z.com:


EmComm and FunComm

by Scott (KK4Z)

As I have said earlier, I practice EmComm to prepare for natural or man-made disasters when normal means of communication fail. FunComm is pretty self-explanatory, it’s things I do for fun. Fun things may include POTA, Field Days (winter and summer), supporting bike rides, and other club activities. I always like it when I can blend the two together. When I participate in POTA either for a weekend camp-out or a day activation, isn’t it kind of a practice run for an EmComm event? I use the same antennas and most of the time the same radios. My equipment gets a good exercise and I learn more about how they operate under different conditions.

Recently, I bought a new camper, the old one wasn’t working well for the things I like to do. The new camper is so much better but not without its growing pains. I had to find a better way to use the radios inside the camper. To save words, here is a picture of what I have been using. It works okay but because it uses part of the bed, it made sleeping uncomfortable. After this last camp out when I woke up all sore and twisted feeling, I decided it was time to find a better way.

The new desk stacks the radio and power supply above the computer. This reduces the overhang on the mattress. The desk area for the paddle does overhang a little but sliding the desk to the right when not in use alleviates that.

The other thing I did was make a cut-out on the door side to make it easier to get my legs out. This works really well and does not impair the stability of the desk.

The last thing is the main desk is 30″ deep and the shelf is 20″ deep. This leaves plenty of room for the radios and enough room to slide the computer under the shelf if I need the desk space for something else.

Sitting behind the desk, the radio controls were easy to get to.

The desk is made from one sheet of 3/4″ plywood with (2) 1×3″x8″ boards. The stain was a can of Minwax I had laying around, I think it was Golden Oak.

Construction was simple, using hand tools found in most garages. It is not a piece of art, I don’t have the time. My philosophy is that “Perfection is the enemy of good enough”. The desk is glued, screwed, and nailed without any fancy joinery. If I waited until I had time to do a better job, the wood would still be at Lowe s.

I tried it out in the driveway and everything works and feels good. The radio is easy to get to and the computer is a little high but not uncomfortable. With the cut-out, it is easy to get in and out of the camper. The next test will be at the end of the month during my next camping trip. Hope to hear you out there. 73 – Scott

Getting To France With Detours: A SOTA/POTA/WWFF Triple Activation

by Thomas (DM1TBE)

As I have written in my activation report for Klínovec, a summit in the Czech Republic, I am trying to activate places outside my home region DM, Germany – Low Mountains in SOTA or DA in POTA. With the May 1st being a public holiday, the long weekend provided a perfect opportunity for an activation a bit further away.

After a while looking around, I chose Brissetish Kopf (FL/VO-126) in France. The summit was close to the German border, hasn’t received much love with only 8 SOTA activations and was also a POTA spot for F-1697 Vosges du Nord Regional Park and WWFF Parc Regional des Vosges du Nord, FFF-0035. That promised enough QSOs for me and provided chances for chasers.

The small cluster to which the arrow points are the Vosges, actually the northern Vosges (Vosges du Nord). The cluster south of it are the higher part of the Vosges. The Vosges are a range of low mountains in Eastern France, which continues as Palatinate Forest on the German side of the border, with the highest summit being 1,424 m / 4,672 ft.

I started my journey quite early, leaving around 8am. During the drive I could not help but had to tease Thomas (K4SWL), who spent quite some time in France and, as far as I know, enjoyed it.

The French region Alsace, through which I had to drive to the Vosges, is quite interesting. The region was disputed over several hundred years between Germany and France and changed back and forth between the two. Many place names are still German, or sometimes a mix of French and German. After the World War II, the region returned to France – hopefully the last change.

I used Google Maps to drive to a parking place close to the summit, but my first attempt ended here:

Not sure why Google meant to show me this – thanks for the 30 minutes detour.

Roughly a half hour later, I arrived at Climbach, the small village next to the summit. Based on findings, the area is populated since the Middle Stone Age, that ranged from 280,000 to 25,000 years ago.

Continue reading Getting To France With Detours: A SOTA/POTA/WWFF Triple Activation

Do I allow antenna wires to touch tree branches during field activations?

Many thanks to Keysrawk on my YouTube channel, who asks:

Do you usually try to use an isolator or do you often let your wires touch branches by just pulling them over? When you deploy 20m EFHWs, for example, do you try to avoid having an end touch a branch and only have the throw line going over the branch? I tried to go through your videos and look but you don’t often mention how far you pull the wire up and possibly over. Thanks!

This is a great question!

Before I answer, I’d like to add a little context:

  1. I am a QRP operator. The maximum amount of power I use in the field is 10 watts, but 99.5% of the time, it’s actually 5 watts or even much less.
  2. I am answering this as a field operator, meaning I’ll be referring to temporary antenna deployments.

That said, the quick answer is no, during park and summit activations, I do not worry about my antenna radiator wire touching tree branches.

I do isolate the end of my wire antennas from tree branches and leaves, but I don’t worry about other parts of the radiator touching.

Also, all of my antenna wire has some sort of jacket–I don’t run bare wire in the field.

More often than not, when I deploy a longer wire antenna–say, a 40M EFHW–I simply use a tree branch to support the apex of the antenna if I deploy it in an inverted vee configuration. Continue reading Do I allow antenna wires to touch tree branches during field activations?

Two SOTA activations in the Swabian Alb – And a broken JPC-7 antenna

by Thomas (DM1TBE)

Intro

I live very close to the Swabian Alb (also known as Swabian Jura or Schwäbische Alb in German). The Swabian Alb is a mountain range in German region Swabia. It ranges from Bavaria in the northeast 200 km / 140 mi to the Swiss border in the southwest.

Thomas Römer, CC BY-SA 3.0, via Wikimedia Commons

The Swabian Alb is a high plateau, which falls slowly to the southeast but with steep cliff-like edges to the northwest. You can follow the northwest edge of the Swabian Alb by looking at the map of the SOTA summits at sotl.as.

The topology limits the possibilities to cross the Swabian Alb, so the course of the routes are more or less unchanged since thousands of years. I live close to an old Roman road. And where an important road was, there isn’t a castle too far away, since the medieval noblemen were quite keen to get its share from passing people and goods.

During the Cold War, important passes received mechanisms to place explosive charges. In case of an advance of the Soviets and its allies, it was planned to blow these roads up, as there was usually no alternative way around.

First Activation: Plettenberg

The Plettenberg (DM/BW-046) is a summit at the edge of the mentioned Swabian Alb, about halfway between Stuttgart and the Swiss border. It’s 1002 m / 3287 ft tall and has a quarry on top.

The quarry uses a ropeway…..

… to transport the stones to the plant.

The way from the parking place to the activation zone was rather short with 300 m /  1000 ft. Continue reading Two SOTA activations in the Swabian Alb – And a broken JPC-7 antenna

Dale uses WSPR to test counterpoise orientation

The CHA MPAS Lite

Many thanks to Dale (N3HXZ) who shares the following guest post:


Does your antenna counterpoise orientation matter?

by Dale (N3HXZ)

I am an avid SOTA and POTA activator and love field operation. I use a portable vertical whip antenna with a single counterpoise for my antenna system and have always wondered if orienting my counterpoise would provide some signal strength gain in a particular direction.  I decided to run a series of tests using WSPR to gather field data, and use statistics to answer the question:

Does one counterpoise orientation favor another in terms of average signal strength?

WSPR is a great tool for antenna testing. You can study various antenna configurations by making some WSPR transmissions and then checking the data on the WSPRnet database to see how well the signal was received at various stations located all over the world. You have to be careful in interpreting WSPR data though as receiving stations have different antenna and radio configurations, and the band propagation can vary rapidly at times. So how do you take advantage of all the data you receive from stations and draw some meaningful conclusions? I have found that using proven statistical theory in analyzing the transmitted signal strength received from individual stations can provide you results that you can confidently trust.

So what statistical algorithm is helpful?

For antenna signal strength comparison between two configurations, you can use an independent two-sample t-test with a one-tailed t-test evaluation. It sounds like a mouth-full, but it is quite simple. For our purposes, the t-test compares the average signal strength at a given receiving station from two different antenna configurations. The one-tailed test validates or invalidates the hypothesis that one antenna configuration produces an average signal strength greater or less than the other antenna configuration.

The testing requires that you run WSPR long enough to gather multiple reports at a single receiving station for both antenna configurations. Using the signal strength reports, you compute the average signal strength and the standard deviation of the signal strength over the sampled data points. Excel can easily provide that data.  With this information and the number of sample points for each antenna configuration (they can be different), you then run a calculation by hand or in Excel to compute the ‘t’ value.

This ‘t’ value is then compared to a critical value for the number of sampling points from a ‘Students t table”. If the ‘t’ value is less than the critical value you can confidently conclude that the hypothesis is false and therefore conclude that there is no significant difference in the mean value of the signal strengths between the two.  If the ‘t’ value is greater than the critical value you can accept the hypotheses that one antenna configuration produces a greater or less average signal strength than the other configuration. Continue reading Dale uses WSPR to test counterpoise orientation

Testing my new Headrest QRP POTA Field Kit!

I love field radio kits.

If you’ve read my “Anatomy of a Field Kit” series, you’ve likely gathered that field kits are a bit of an obsession. [Yeah, understatement alert!]

My field kits roughly fall into two main categories: modular and fully self-contained. My modular kits are ones where components like the battery, antenna, throw line, key, and radio are in separate pouches and can easily be combined to make a complete station before I leave for an activation.

My fully self-contained kits are ones that quite literally have everything needed to perform a park or summit activation in one pouch or box. A good example that I’ve documented here is my MTR-3B field kit.

For more on this, again, check out my “Anatomy of a Field Kit” series.

Vehicle kit

If you’re a devoted park and/or summit activator, I think it’s important to keep a dedicated kit kit in your car at all times. Why?

  • It’s ready to grab for impromptu activations
  • It’s handy in case of road-side emergencies in remote areas
  • It’s always  accessible to demonstrate amateur radio to those who are curious
  • It’s always always there for those times when you hadn’t planned to play radio, but the opportunity presents itself

I always have a full radio kit in my Subaru and over the years, I’ve changed and adapted it. For the most part, though, it’s been located in the trunk/boot and lives with anything and everything else I keep back there. Sometimes, it’s in the way when we need to fill that trunk space with family items for a trip or when we’re hauling things around town. Other times, it’s floating/sliding around freely in the back.

On long family trips, I’ve been known to store radios under the floor, but it’s a true hassle to remove them because I have to remove anything in the trunk before lifting the floor.

Contraband I hid in the car during our two month Canada trip last year.

I’ve always wanted a way to store my kit in the car in a dedicated space. In the past, I’ve tried to make a kit that could fit under the driver’s seat–thinking that might be ideal–but there’s very little clearance under it and it’s difficult to remove.

Enter the BROG Headrest Pouch Kit

Before I placed my initial order for the Blue Ridge Overland Gear (BROG) Gadget Bag, I checked out other items on their website. One that immediately caught my attention was their Headrest Kit.

It consists of a Velcro panel that fits around a vehicle headrest and a pouch (or pouches) attach to it.

BROG caters to Overlanders and vehicle storage/organization is huge in that community. The headrest kit makes a lot of sense: it’s using space that’s accessible, doesn’t interfere with any passengers, is off the floor, and is otherwise underutilized!

The big questions, of course:

  1. would the pouch offer enough space to store an entire radio kit,
  2. and would the kit weight too much for the Velcro back to hold it in place?

I asked for the Headrest Pouch Kit ($47.99) to be sent with my Gadget Bag order.

BTW: Big thanks to BROG for giving me flexibility with this order. Since I had no experience with their gear, I asked that they send me a list of items and allow me to evaluate them, then pay (full price) for what I decided to keep. 

Would it work?

I knew I’d need to store a very small transceiver in this dedicated pack. A few could potentially fit the bill–namely the:

  • Mountain Topper MTR-3B
  • Venus SW-3B
  • QCX-Mini
  • TEN-TEC R4020

I eliminated the QCX-Mini from this list because it’s mono band (mine is set for 20M) plus, I really love the field kit I already designed for it. Same for the MTR-3B–the kit I built for it is now time-tested and I love it as-is. The R4020, while quite compact, is the largest in this group of wee rigs. Continue reading Testing my new Headrest QRP POTA Field Kit!

Coax cables I used for SOTA/POTA – A horror story

by Thomas (DM1TBE)

I think every portable operator thinks about their coax cables and how to use more light and flexible types. During the last few activations, I have switched from my rigid Aircell 5 to the lightweight and flexible RG316. I have bought a couple of different lengths, mainly from Chinese online sellers at AliExpress.

However, I had some hard to define issues like the vague feeling that I am not getting out as good as I should, or a changing SWR during an activation. So I thought I should check my cables before looking at other parts of my equipment.

My professional and educational background does not have anything to do with electronics, and I don’t have the equipment to measure the cable loss directly. But my goal was to check if the cables were faulty, not to measure the exact attenuation.

I have an SWR and Power meter from DJ9PK as per image below. It can measure PEP and has, according to the seller, an accuracy of +/-4 percent.   You can find more details about it here in German or here in English (Google / auto translated).

My KX3 with a CW paddle served as signal source. As large differences are easier to spot than smaller, I switched to the 10-meter band as the HF band with the highest attenuation.

I then measured a short cable with a very low loss, a 1 m / 3.3 ft RG213, which should have an attenuation of less than 0.1dB (excluding plugs).

I simply checked how much power came out at the other end of the cable. That value I have used as reference. This cable (and all others) was plugged directly between the KX3 and the power meter, no ATU involved anywhere. The power meter was set to measure PEP. Continue reading Coax cables I used for SOTA/POTA – A horror story